Contents

On-demand webinar
How Good is My Shield? An Introduction to Transfer Impedance and Shielding Effectiveness
by Karen Burnham
Get instant PCB fab and assembly cost estimation for your designs through Sierra Circuits’ KiCad quote plugin. You can quote within the KiCad UI and eliminate the need for external quoting tools, thus reducing your product’s time-to-market.
In this tutorial, you will learn how to install the plugin and generate real-time circuit board quotes.
How to install and configure Sierra Circuits’ KiCad quote plugin
Steps to download the plugin from the Sierra Circuits’ website
Step 1: Go to the KiCad Quote Plugin page.

Step 2: Enter the signup details.

Step 3: Click Download KiCad Plugin. A zip file named create_quote_v4.2 will be downloaded.

If you’d like to download the instructions manual, hit Download Manual.
Step 4: Extract the zip file to the KiCad directory, i.e., KiCad –> latest version of KiCad–> scripting –> plugins.
Step 5: Access the plugin by clicking Tools –> External Plugin –> Sierra Circuits Quote.

To create a shortcut on the toolbar, go to Preferences –> Preferences –> PCB editor –> Action Plugins, check the show button and hit OK.
This brings up the plugin icon on the top of the toolbar, as shown in the image below.
To learn how to create component libraries and high-speed schematics in KiCad, download our e-book.

KiCad Design Guide
10 Chapters - 161 Pages - 180 Minute ReadWhat's Inside:
- Creating a component symbol library
- Setting up board parameters and rules
- How to route differential pairs
- How to place of components
Download Now
Steps to download the plugin from the KiCad PCM repository
Step 1: Open the KiCad tool and select Plugin and Content Manager (PCM) on the home page.

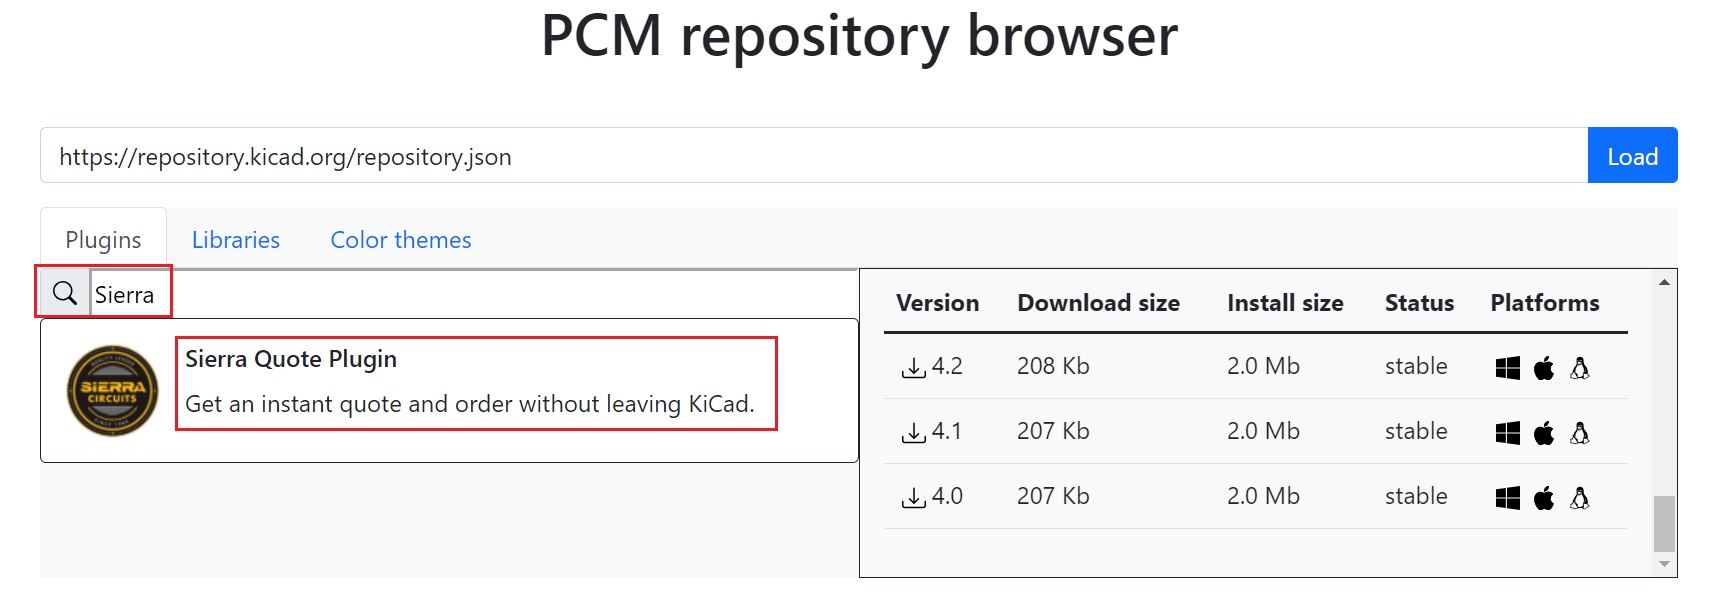
Step 2: Search for Sierra Quote Plugin under the repository section. Here, you can select the latest version of the plugin and click on Install, followed by Apply Pending Changes.
Step 3: Access the plugin by clicking Tools –> External Plugin –>Sierra Circuits Quote.
You can also download the plugin file from KiCad’s Plugin and Content Manager repository.
How to get an online quote using the KiCad plugin
Step 1: Launch the plugin and log into your account
Once the design process is complete, click the plugin icon. You have three options to proceed:
- Log in with your credentials: Access your account using your username and password. If you already have a Sierra Circuits account, you can go to step 2.
- Create a new account: If this is your first time using the plugin, sign up for a new account by following the registration process.
- Continue as a guest: Access the plugin without creating an account, allowing for limited functionality without registering. Here, you can proceed by just entering your email ID.

To create a new account, you must fill out the New User Registration form.

After registration, a confirmation email will be sent to your registered mail ID, as shown below.

After confirming your registration, you can access the plugin using your credentials and start quoting.
Step 2: Validate the board parameters
Once you log into the quote plugin, you will be navigated to the home page as shown in the image below.

This page displays 5 tabs: board geometry, board clearances, holes, surface, and finalize. The significance of these tabs is explained below.
Board geometry
In this section, you need to input:
- Dimensions: Defines the exact dimensions of the PCB. This data is automatically populated from the design file.
- Quantities: Here, specify the total number of boards as per your requirement, with a minimum order quantity of 3.
- Number of layers: Indicates the number of layers in your stack-up.
- ITAR compliance: By default, ITAR compliance is set to “No.” To place an ITAR-compliant order, please visit our Sierra Circuits website for further instructions.
- Overall thickness: This shows the overall thickness of the board.
Board clearances

This tab displays the minimum trace width and spacing on your board’s inner and outer layers. This data is automatically extracted from the design file.
Holes

The holes tab has 2 sections:
- Drill hole: It displays drill characteristics such as count, density, minimum size, and minimum annular ring.
- Slots and cutouts: Here, you can see slots and cutouts’ count and plating status. You can also set the plating status using the dropdown.
These values are automatically populated from the PCB design file.
Surface

Here, you need to define 3 parameters:
- Silkscreen: Specify which layer(s) the silkscreen should be present on (top, bottom, both, or none). Additionally, you can select the material and color of the silkscreen.
- Soldermask: Mention the layer(s) on which the soldermask should be present. You can also choose the color, finish, and type of the soldermask required.
- Surface finish: The type of PCB surface finish and the thickness of the outer and inner copper layers should be set here.
Finalize
In the finalize tab, electrical netlist testing can be selected. This test is mandatory for boards with more than 6 layers.

Once all the requirements are defined, click Validate to authenticate the provided information. If the provided data has discrepancies, the plugin will display a warning message, as shown below.

The errors are categorized into critical and non-critical. You will get the quote even if there are non-critical errors. However, the critical errors should be fixed before quoting. Next, click on Get Quote to view the cost estimate. Here’s a sample quote.

The total price depends on the quantity of the board and the turnaround time. Select the desired quote and hit OK. This takes you to the Sierra order webpage.
If you want to quote for fabrication and assembly, go to step 4. Else, continue with step 3.
Step 3: Verify the quote summary and place the order (without assembly)
Here, we will see the steps to get an online PCB quote without assembly.
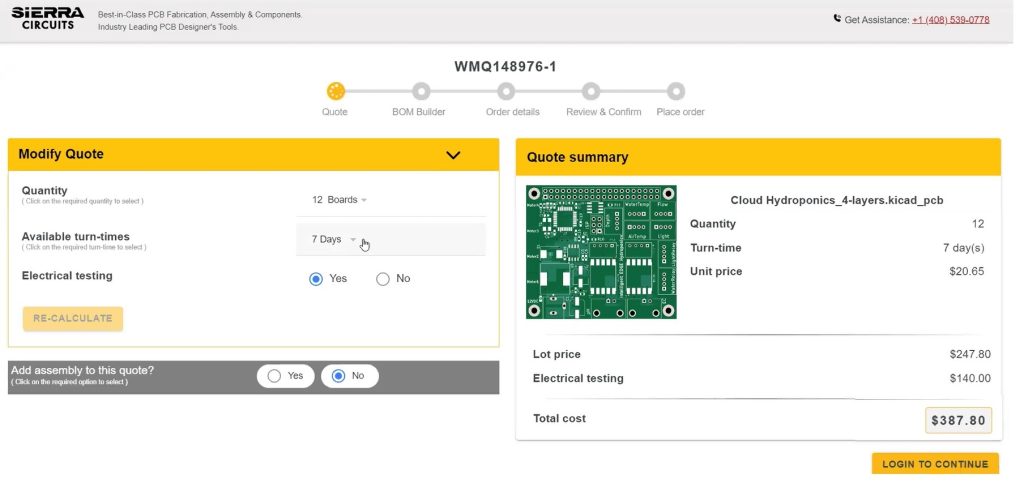
After choosing the required quote, you will be redirected to the order page. You can tweak the requirements concerning board quantity, turnaround time, and electrical testing here.
Once you modify, hit Re-calculate to reflect the changes in the final quote. Next, click on Login to Continue to fill in the order details.
Here, fill in the order details such as shipping, billing, designer address, promo code, if any, payment info, and tax and resale info. You can also choose your preferred shipping partner in this section. You can record any specific comments related to shipping and handling here.

If you’re not authorized to make the payment, you can still place your order by providing details of the purchasing person.
Once you place the order, the system sends a payment link directly to your purchasing person via email, enabling them to complete the transaction.

After filling out all the required data, click Review order to verify the details. Once done, Hit Place my order.

After placing the order, you can set the notification preferences per your needs on the order confirmation page.

Download our KiCad 9 Step-by-Step Guide to quickly understand the PCB design workflow.

KiCad 9 Step-by-Step Guide
6 Chapters - 41 Pages - 30 Minute ReadWhat's Inside:
- A complete KiCad 9 workflow from project creation to production file generation
- Step-by-step guidance on creating custom libraries and linking symbols to footprints
- Practical design checks: ERC and DRC
- Best practices for generating a clean BOM and fabrication-ready Gerber files
Download Now
Step 4: Verify the quote summary and place the order (with assembly)

On the Sierra quote page, select Yes beside Add assembly to this quote?.
Next, hit Continue. A screen opens with two options: Generate BOM and Login to Checkout.

Click on Generate BOM to view the auto-generated component list. You can continue with the order without assembly by clicking on PCB Checkout.

You may not find some of the components in the BOM in our database. You can view this information for each component under the Status column.
If you want to tag a component as do not install select the component using the respective check box (on the left) and click on the DNI. Similarly, if you want to delete any components, you can select that component and hit Delete. Click on New Item to add any new component to the BOM.
It is mandatory to resolve all the line items before placing an order. Choose do not install to exclude those particular components from the quote. You need to replace the components with an alternative to fix these issues. You can look for different components by performing value, MPN/VPN, and description searches.
To fix the component line item, click on Fix. The search assist window appears as shown below.

Value search

The value search tab helps you find components based component’s value, quantity needed, footprint, reference designator, and tolerance. The system looks for matching components based on these details.
MPN/VPN search

In this tab, you can search for the components by providing the item number, quantity, reference designators, MPN (manufacturer part number), and VPN (vendor part number). The system displays the search results in a table format with various component attributes.
Description search

Users can search by entering component values, MPNs, VPNs, or descriptions. The search results display component details, including image, MPN, manufacturer, VPN, description, tolerance, RoHS compliance, source, and availability.
After fixing all the errors, the BOM page will display “Your BOM is ready!”. Click continue to proceed further.

If you want to upload a customized material list, click Upload Custom BOM. Once you upload the file, the plugin automatically maps the line items.

If there are any discrepancies in mapping, you can rectify them manually using the respective drop-downs. Click on Proceed if the line items are mapped accurately.
A window pops up, confirming the uploaded custom file is ready.

Once you hit Continue, a window pops up confirming the validation of your BOM file as shown below.

After BOM validation, Click on Generate Quote to proceed with the order. Here, you will have an option to tweak your requirements, as we saw earlier.

After verifying the data, click Login to continue to proceed with the order and provide the required information.

After filling out all the required data, click Review order to validate the provided information. Next, hit Place my order.

Once you place the order, you can set the notification preferences as per your needs on the order confirmation page.


Sierra Circuits’ Kicad PCB quote plugin lets you instantly receive a quote without exiting the KiCad design environment. Let us know in the comments section if you require assistance implementing our plugin. We would be happy to help you out.
We have developed numerous PCB design tools to help you automate your PCB design process. To know more, check out our Designer’s tools section.
Need help with your PCB designs? Post your queries on SierraConnect. Our experts will answer them.

About Milan Yogendrappa : Milan Y is an electronics and communication engineer with over 6 years of experience in developing and editing technical articles related to PCB design, manufacturing, and assembly. He is currently the editor-in-chief at Sierra Circuits.